📌 When you add an external calendar to Booost, we import 90 days of future events.
If you don't see events beyond that timeframe, don't worry — your calendar is properly connected and will resync every 24 hours.
We know there are so many different calendars out there. From well-known options like Google and Outlook, to university-managed, academic, or lesser-known calendars, everyone’s setup can look a little different.
While Booost currently supports direct connections with some calendar providers, we’re actively working on expanding calendar integrations to support even more options.
Connect a supported calendar directly
If you’re looking to connect one of the calendars we currently support, you can follow the step-by-step guides below:
We’re actively improving calendar support in Booost 💛
If there’s a calendar you’d love to see integrated (for example, a specific university or academic calendar system), we’d love to hear from you.
📧 Get in touch by clicking on the 'Contact Us' icon in the bottom right hand corner of your screen. We'll add your vote to the calendar you'd like to see added.
What can I do if my events aren't appearing?
If your calendar has connected successfully but your events aren't appearing yet, don't worry. Calendar syncing can sometimes take up to 24 hours due to factors outside of Booost's control.
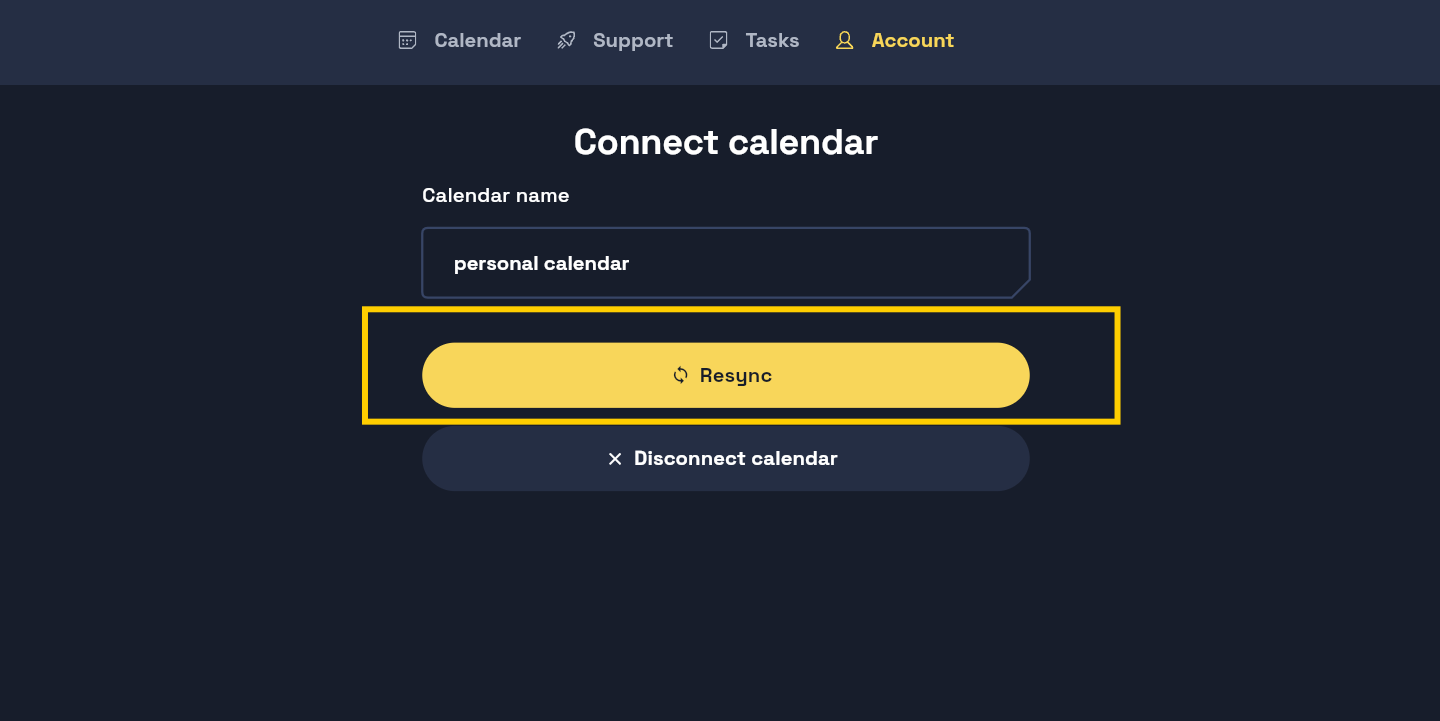
If you'd like to trigger a sync manually, you can do so by navigating to:
Account → Connected Calendars → Select your calendar → Resync
This will request an immediate refresh of your calendar data rather than waiting for the next automatic sync cycle.
Don’t see your calendar? Use Google Calendar as a bridge (recommended)
If your calendar can’t be connected directly to Booost right now, the best workaround is to connect it to Google Calendar first, then link Google Calendar to Booost. This works well for many academic and custom calendars.
Step 1: Get the calendar URL from your original calendar
Most calendars (including university systems) allow you to generate a calendar URL (often called an iCal or ICS link).
Copy this URL — you’ll need it shortly.
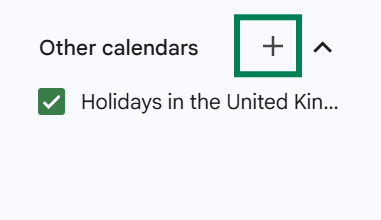
Step 2: Add the calendar to Google Calendar
Go to Google Calendar (create a Google account if needed — it’s quick and free).
On the left-hand side, under Other calendars, click the ➕ plus icon.
Select From URL.
Paste your calendar URL when prompted.
Add the calendar.
Step 2.2
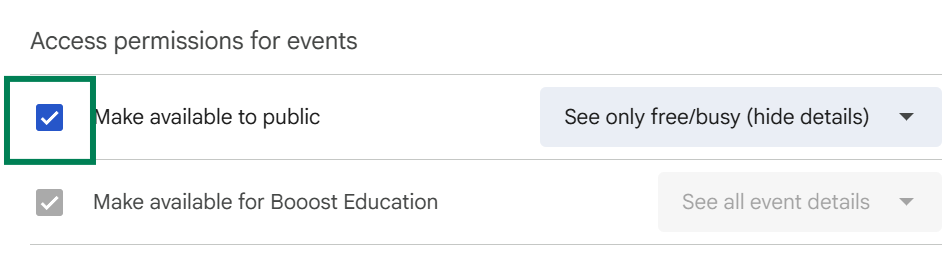
Step 3: Make the calendar accessible
Your newly added calendar will now appear in the left-hand sidebar with its own row.
Click on the calendar name and open Calendar settings.
Scroll to Access permissions for events.
Select Make available to public.
Confirm the message explaining that this makes the calendar public.
You must select “Make available to public” for Booost to access your calendar.
Choosing “See only free/busy, hide details” lets Booost (and anyone with the link) see only when you’re busy or free.
Choosing “See all event details” allows Booost to read full event information to help you manage your workload.
Step 3.4
Step 4: Copy the calendar link from Google
Still in Calendar settings, scroll down to Integrate calendar.
Copy one of the following:
Public address in iCal format, or
Secret address in iCal format
(Click the 👁️ eye icon to reveal it before copying.)
Either option works with Booost.
Step 4.1
Step 5: Connect the calendar to Booost
Log in to booost.com
From the top menu, go to Calendars
Select Add event → Connect calendar
Paste your copied calendar URL
Click Next to finish connecting
Step 5.3
Need help?
If anything feels confusing or doesn’t work as expected, you’re not alone — calendars can be tricky, especially academic ones. Reach out to us anytime by clicking on the 'Contact Us' icon in the bottom right hand corner of your screen, and we’ll help you get set up.